Mastering8/24/2018 The mastering intensive seemed to be relatively easy for me, personally speaking. During the intensive we were grouped into pairs of three and I was lucky enough to be grouped with Izzy and Denver. Denver and I seemed to kick it off immediately leeching from each other as we went through the whole process of mastering tracks. The first week of mastering was difficult since I was put into a group and all I could think of was sorting out a few issues with my visa extension. I seem to have bad luck with my visa, they literally banned me from working and I couldn’t pay rent, I was literally homeless looking for a place to stay for 3 days. I’m staying in my friends’ room and I sleep on the floor, but I managed to rock up for class the next week.
In the second week of mastering, we managed to do a good job with mastering a lot of tracks. Our aim was not to just get it louder but to focus more on fixing the problems with the tracks. One of the tracks had an annoying static sound, which we fixed quite quickly using Izotope RX5. Finding the information online was pretty easy for us, but implementing it seemed to be difficult since we had no prior experience with reducing static sound. Another track had a problem where the vocals weren’t popping out as much. It seemed as though the guitars were overpowering the vocals and we needed to somehow tame the guitars and not affect the overall sound. In a real-world scenario, it would be difficult, but because we were only in the learning stages of mastering, the audio conveniently had the guitars panned on each side. Denver was quick to point that out as I was figuring out a way push the vocals forward using a multiband eq raising the frequencies where the vocals sounded like they were in ever so slightly. After we noticed the guitars were panned I remember Clarkey talking about mid-side compression from the week before, so we managed to tame the guitars using mid-side compression and successfully brought out the vocals. Izzy was going wild using outboard gear for one of the tracks, we noticed the drums had to be tamed a lot, particularly that snare. After getting our hands on the outboard gear and failing miserably (mind you we were in the big audient), we decided not to touch it and rely solely in the box. What we learned that week proved to be useful for the next week since we managed to utilise everything for next week. The following week we were put into the same groups but in the S6. We had to master 3 tracks and were not given any information on how to do so. So, each of us chose 1 track (since there were three of us) and we decided we would master it alone and only ask for feedback once we finished. We were given Soundalike tracks, Denver did Smooth Sailing, Izzy did Bring Me To Life and I did Show Me How To Live. A big hint into mastering tracks is knowing what sound you want and knowing what the artists want as well. The problem was, I had no clue what Audioslave sounded like (I do know now). Denver did an amazing job with Smooth Sailing, we could have paid attention to that hum in the background and use the RX5 to take it out, but we were just sloppy and didn’t notice it. Izzy and her Bring Me To Life master was good as usual. I can only extensively talk about Show Me How To Live because I know exactly what I did to it. I never heard of the song before and delved right into what I thought the song should sound like. I felt like the vocals were a bit lacking and so again, I utilised what I learned last week, MS Compression. I compressed to guitars on the side and made the vocals come out a bit to a point where you could hear what he was saying. A real Audioslave fan wouldn’t do that, but I was mixing with absolutely no bias whatsoever. I did more compression, got rid of some low end, boosted some of the bass as well, used a vintage limiter on it and got the RMS to about – 9.8 with the limiter set to limit audio at -0.3. This was the morning session. The afternoon session was fun since we could master whatever we wanted, and I ended up mastering on of Denver’s Soundalike. Knowing Denver, I wasn’t surprised at all in the way he changed Shape Of You. There was a lot to be done regarding mixing, but it was already in the mastering stage, so I couldn’t do as much as I wanted to in order for me to fix it completely. I first added an equaliser to the song trying to take out and highlight the sounds I liked. I cut out anything coming in from below 40hz and added a 0.8dB boost at about 180hz. I took away about 2dB at 2kHz and 1.5dB at 9.5kHz all in the Mid. In the Side I took out more than 3dB at 7.5kHz. I then added dynamic compression where I compressed the song in bands. Band 1: 20Hz – 140Hz Compressor – Ratio 13.1:1, Attack 3ms, Release 51ms. Knee 10.0 Band 2: 140Hz – 3.09kHz Compressor – Ratio 9.0:1, Attack 3ms, Release 22ms, Knee 10.0 Band 3: 3.09kHz – 9.39kHz Compressor – Ratio 30.0:1, Attack 3ms, Release 27ms, Knee 10.0 Band 4 9.39kHz – 20kHz Compressor – Ratio 11.0:1, Attack 3ms, Release 22ms, Knee 10.0 I also applied a vintage compressor in the Mid with a Threshold of -14.2dB a ratio of 5.6:1, Attack of 1.0ms and Release of 30.0ms in Smooth Mode. I compressed the side at a Threshold of -29.4dB, a Ratio of 2.4:1, Attack 24.0ms and a Realease of 100.0ms in Balanced Mode. I then put a maximizer with a ceiling of -0.3dB and a threshold of -9.0. I added 3.55 of Character and Stereo Unlinked the track at 5%.
0 Comments
Freelance8/23/2018 For this trimester, we were required to do a compulsory of at least 20 minutes worth of freelance work in order for us to complete our baseline assessments. At first I thought it was going to be a piece of cake, but then it later proved difficult because my freelance project didn't revolve around my schedule, it revolved around the artists schedule. Initially for my freelance I scheduled a solid plan for an upcoming Korean artist who's name I will not mention due to privacy concerns. The artist was keen on me recording, mixing and mastering his EP which contained 4 tracks, each roughly 4 minutes long along with 2 solo tracks which he was then going to direct a music video with. Unfortunately I fell sick for about 2 weeks in between, which didn't seem to hinder the freelance much as he was still working on the lyrics. We however managed to record, mix and master one of the tracks to his liking upon which he asked me if we could record the next 3 songs after 2 weeks. I was all in for it and devised a plan which would allow me to finish all the recording, mixing and mastering and have it uploaded on soundcloud by the deadline, but week after week he kept postponing and I was stuck in a pickle. I realised I needed a backup plan and so I went asking around until I found a legitimate client. The clients name and workplace is confidential, but I will link in the video so you can view it. I hit the jackpot. They wanted me to record a step to step directional video on How To Make A Cruffin. A cruffin is a hybrid of a croissant, a popular French pastry, and a muffin. The pastry is made by proving and baking laminated dough in a muffin mould. The cruffin is then filled with a variety of creams, jams, crème pâtissières or curds, and then garnished. Sound funky and cool but it was a difficult task considering the amount of prep it took. I had to first meet the Chef who then explained to me the step by step process (Yes, I now know how to make a cruffin like the back of my hand) after which I had to craft a monologue and send it over to her. She then had to remember the monologue since it was designed in such a way that it didn't sound forced, repetitive and robotic. I knew how to write a proper screenplay style story since I had studied Storytelling in Contemporary Media (MDU111) for my elective the previous trimester. While I gave time for the chef to practice her monologue, I had to go to the site where I was to record the video. The problems I faced were simple, i wasn't a videographer and when I was handed a camcorder i had absolutely no idea how it worked. so I had done research beforehand and learned how to use the focus, white balance and essentially how to obtain the best quality I could. I was also given a RODElink by Rode, it basically comprises of a belt pack receiver, belt pack transmitter, lavalier (lapel) microphone and camera mount. The best part of it was the fact that you could walk 100 meters away, and the signal would still be as strong as it is when kept a meter away. This proved handy on the day of recording since I noticed how much the chef liked to move around, and so I decided to leave her be and do what she does best since I was in her domain now. I used to watch a lot of cooking shows and I still do these days, but my whole perspective has now changed whenever I watch cooking shows now. Usually the show doesn't last for more than an hour, and if it's just one dish, then it's usually about 30 minutes of screen time. Here comes the part which I wasn't ready for, the baking. The thing about professional food channels is that, they precook everything so as to waste minimal time. I hadn't taken this into consideration and I went in there thinking we would be done in an hours time, but no. It took us a flipping 4 hours to shoot the whole thing. The first hour and a half went by so fast, and we were just done with making the dough, the next hour we waited since the location we were shooting at was a legitimate kitchen in a cafe with chefs waiting on us. We chucked in the dough and let it bake, meanwhile the other chefs prepared sandwiches for the Cafe. They took roughly about an hours time, and once they were done, the cruffins were done too. I was surprised at how fast they had cleaned everything, enough time for us to start setting up to record the second half of the video. The second half was quick since the cruffins were lukewarm and we didn't have to wait for them to cool down. She explained that you need to wait till the cruffins are cool in order to plate it, else you'll burn your hand. After everything was done I quickly went to their office and started editing the video on their system. The editing process proved to be a nightmare since I had to learn how to use Adobe Premiere Pro and have the video ready ON THE SAME DAY. I managed to obtain copyright free music and lay it in the video to make the video more vibrant. This is what the final product looks like. personally it's not one of my favourite works, but to be able to apply techniques that I've learnt outside the Audio Engineering spectrum proved very valuable to me. I didn't expect that I would be writing monologue scripts for a video that I would be recording and editing by myself and having a client like my work and posting it up on their page. The work I've done shows me how much I need to improve, but it has also shown me how many skills I've learnt during my time in SAE. Skills that had laid dormant, now awakened once stimulated. 5.1 Production8/12/2018 I never really thought I would be in this type of situation, but not once did I ever imagine myself creating music in 5.1 surround sound. The order of channels in a 5.1 file is different across file formats. The order in wav files is Front Left, Front Right, Center, Low-frequency effects, Surround Left, Surround Right. It is ideal to use five matched speakers with the same levels in order to achieve proper localization and equability of all acoustic sources for a centered positioned audience. 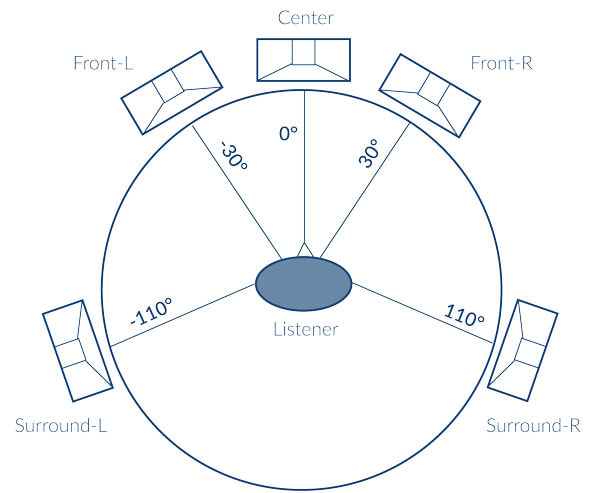 In the image above, the placement of the identical speakers can be observed. Now why on earth would I want to make a song in 5.1? Well, it's part of my intensive this trimester. In this intensive I have been paired with two other producers who have their own style and vision of production. This was difficult since we needed to create a minimum of 7 minutes worth of audio EACH. That's right, our EP had to be at least 21 minutes long and had to flow through each song effortlessly.
|